


You are looking at the documentation of a prior release. To read the documentation of the latest release, please
visit here.
Using IRSA with KubeStash on Amazon EKS
This guide will show you how to use IRSA(IAM Roles for Service Accounts) of Amazon Elastic Kubernetes Service (Amazon EKS) with KubeStash. Here, we are going to backup a DaemonSet and store the backed up data into a AWS S3 bucket.Then, we are going to show how to restore this backed up data.
Before You Begin
- At first, you need to have an EKS cluster with IRSA enabled. If you don’t already have a cluster, create one from here.
- Install
KubeStashin your cluster following the steps here. - You should be familiar with the following
KubeStashconcepts: - You will need a AWS S3 Bucket to store the backup snapshots.
- Install
eksctlfollowing the steps here.
To keep everything isolated, we are going to use a separate namespace called demo throughout this tutorial.
$ kubectl create ns demo
namespace/demo created
Create IAM Policy
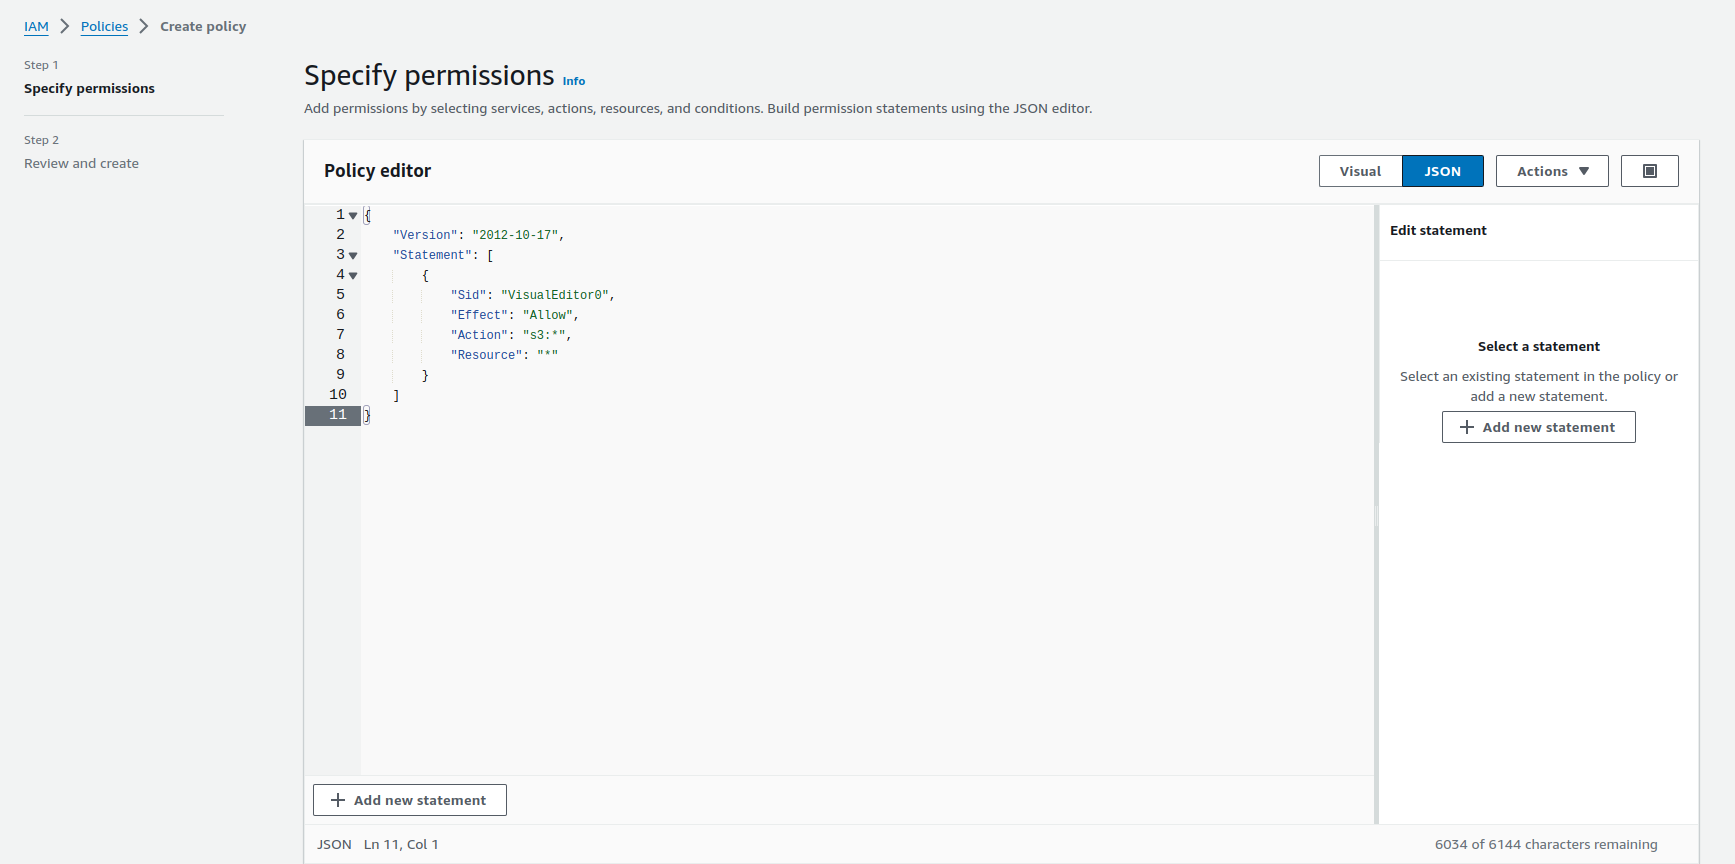
We need a IAM policy for accessing S3 buckets. Below is the JSONof the IAM policy we are going to create,
{
    "Version": "2012-10-17",
    "Statement": [
        {
            "Sid": "VisualEditor0",
            "Effect": "Allow",
            "Action": "s3:*",
            "Resource": "*"
        }
    ]
}
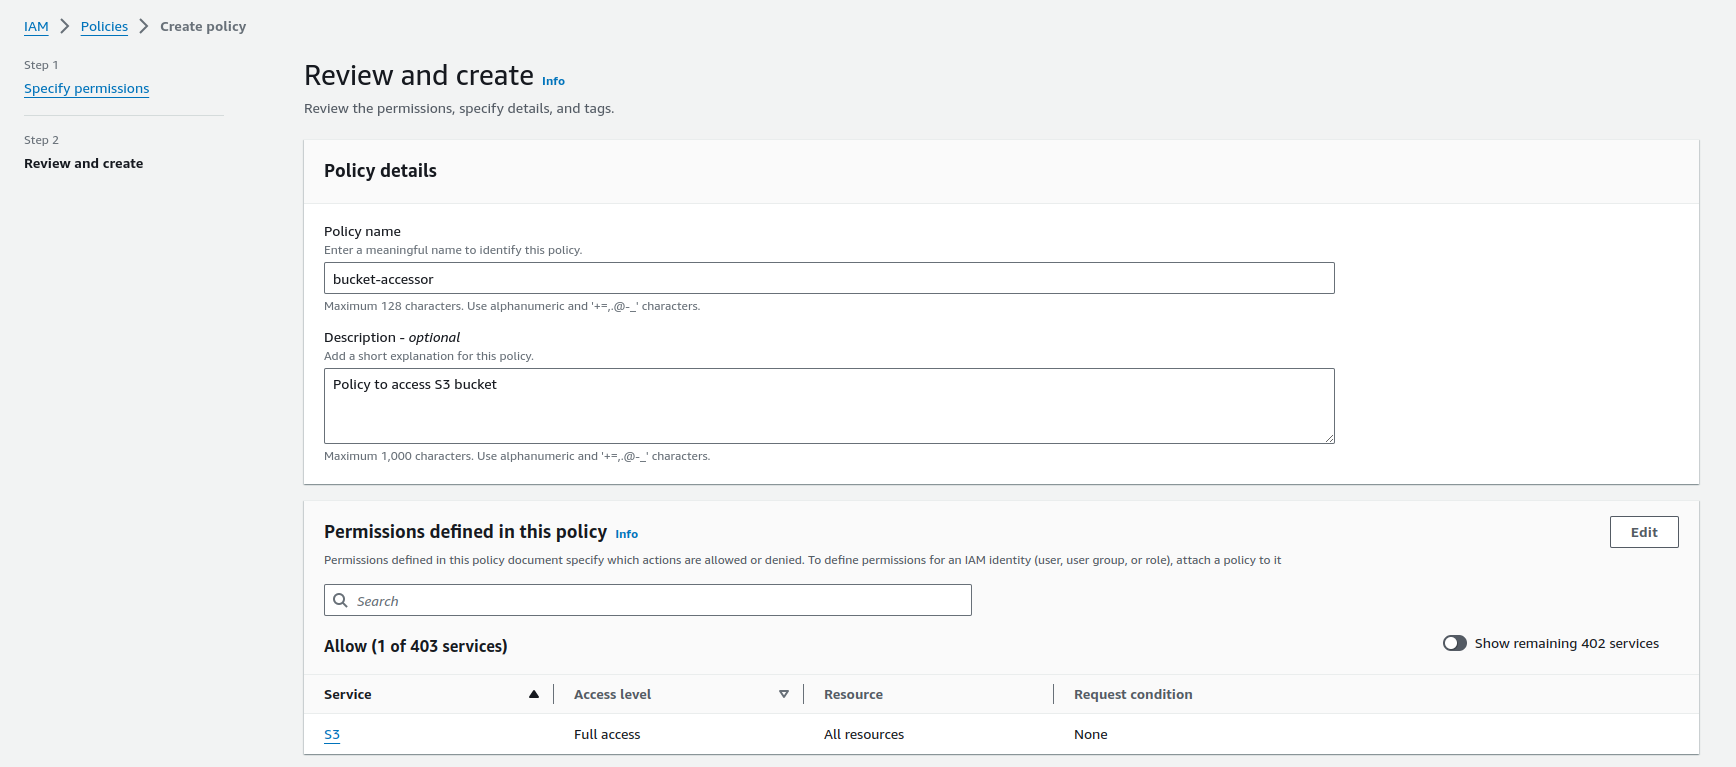
Let’s navigate to the IAM console (IAM > Policies > Create policy) to create a policy bucket-accessor with full access permission to S3 bucket.
Prepare KubeStash Operator
We need a IAM role with the policy bucket-accessor attached and annotate the Kubernetes service account for KubeStash operator with that IAM role. Use the following command to do all these steps at once.
eksctl create iamserviceaccount \
      --name kubestash-kubestash-operator \
      --namespace kubestash \
      --cluster irsa-demo \
      --attach-policy-arn arn:aws:iam::452618475015:policy/bucket-accessor \
      --approve \
      --override-existing-serviceaccounts
This command will create a IAM role with the bucket-accessor policy attached and annotate the operator service account with that IAM role in the kubestash namespace.
After annotating the operator service account with that IAM role, we need to restart the operator pod using
kubectl delete pod -n <operator-pod-namespace> <operator-pod-name>.
Prepare DaemonSet
In this section, we are going to create a DaemonSet. We are going to configure the DaemonSet to generate sample data in each replica.
Create DaemonSet
At first, let’s create a DaemonSet named ks-demo,
apiVersion: apps/v1
kind: DaemonSet
metadata:
  labels:
    app: ks-demo
  name: ks-demo
  namespace: demo
spec:
  selector:
    matchLabels:
      app: ks-demo
  template:
    metadata:
      labels:
        app: ks-demo
      name: busybox
    spec:
      containers:
        - args: ["echo sample_data > /source/data/data.txt && sleep 3000"]
          command: ["/bin/sh", "-c"]
          image: busybox
          imagePullPolicy: IfNotPresent
          name: busybox
          volumeMounts:
            - mountPath: /source/data
              name: source-data
      restartPolicy: Always
      volumes:
        - name: source-data
          hostPath:
            path: /kubestash/source/data
$ kubectl apply -f https://github.com/kubestash/docs/raw/v2024.6.4/docs/guides/platforms/eks-irsa/examples/daemonset.yaml
daemonset.apps/ks-demo created
Now, wait for the DaemonSet pods to go into Running state,
$ kubectl get pod -n demo
NAME            READY   STATUS    RESTARTS   AGE
ks-demo-kjn7t   1/1     Running   0          51s
ks-demo-tlbtv   1/1     Running   0          51s
ks-demo-xb7lv   1/1     Running   0          51s
Once the pods are in Running state, verify that the DaemonSet pods has sample data in it.
$ kubectl exec -it -n demo ks-demo-kjn7t -- cat /source/data/data.txt
sample_data
From the above, we can see the sample data is set successfully.
Prepare Backup
In this section, we are going to prepare the necessary resources before backup.
Prepare ServiceAccount
We need a IAM role with the policy bucket-accessor attached and a Kubernetes service account annotated with that IAM role. Use the following command to do all these steps at once.
eksctl create iamserviceaccount \
     --name bucket-user \
     --namespace demo \
     --cluster irsa-demo \
     --attach-policy-arn arn:aws:iam::452618475015:policy/bucket-accessor \
     --approve
This command will create a IAM role with the bucket-accessor policy attached and a service account bucket-user annotated with that IAM role in the demo namespace. We will use the service account in the BackupStorage, BackupConfiguration and RestoreSession to enable backup and restore using IRSA.
If
BackupStorage,BackupConfigurationandRestoreSessionare in different namespaces, we need to create a IAM role with thebucket-accessorpolicy attached and a Kubernetes service account annotated with that IAM role in each namespace. Here we are usingdemonamespace for all of these objects, so only one service account is enough.
Prepare Backend
We are going to store our backed up data into a S3 bucket. As we are using IRSA, we don’t need the storage secret to access the S3 bucket.
Create BackupStorage:
Now, let’s create a BackupStorage with the information of our desired S3 bucket. Below is the YAML of BackupStorage CR we are going to create,
apiVersion: storage.kubestash.com/v1alpha1
kind: BackupStorage
metadata:
  name: s3-storage
  namespace: demo
spec:
  storage:
    provider: s3
    s3:
      endpoint: 's3.amazonaws.com'
      bucket: kubestash
      prefix: demo
      region: us-east-1
  usagePolicy:
    allowedNamespaces:
      from: All
  default: true
  deletionPolicy: WipeOut
  runtimeSettings:
    pod:
      serviceAccountName: bucket-user
Let’s create the BackupStorage we have shown above,
$ kubectl apply -f https://github.com/kubestash/docs/raw/v2024.6.4/docs/guides/platforms/eks-irsa/examples/backupstorage.yaml
backupstorage.storage.kubestash.com/s3-storage created
Now, we are ready to backup our sample data into this backend.
Create RetentionPolicy:
Now, let’s create a RetentionPolicy to specify how the old Snapshots should be cleaned up.
Below is the YAML of the RetentionPolicy object that we are going to create,
apiVersion: storage.kubestash.com/v1alpha1
kind: RetentionPolicy
metadata:
  name: demo-retention
  namespace: demo
spec:
  default: true
  failedSnapshots:
    last: 2
  maxRetentionPeriod: 2mo
  successfulSnapshots:
    last: 5
  usagePolicy:
    allowedNamespaces:
      from: All
Let’s create the above RetentionPolicy,
$ kubectl apply -f https://github.com/kubestash/docs/raw/v2024.6.4/docs/guides/platforms/eks-irsa/examples/retentionpolicy.yaml
retentionpolicy.storage.kubestash.com/demo-retention created
Backup
To schedule a backup, we have to create a BackupConfiguration object targeting the respective DaemonSet. Then KubeStash will create a CronJob for each session to periodically backup the DaemonSet.
At first, we need to create a secret with a Restic password for backup data encryption.
Create Secret:
Let’s create a secret called encrypt-secret with the Restic password,
$ echo -n 'changeit' > RESTIC_PASSWORD
$ kubectl create secret generic -n demo encrypt-secret \
    --from-file=./RESTIC_PASSWORD \
secret "encrypt-secret" created
Create BackupConfiguration:
Below is the YAML for BackupConfiguration object we are going to use to backup the ks-demo DaemonSet we have deployed earlier,
apiVersion: core.kubestash.com/v1alpha1
kind: BackupConfiguration
metadata:
  name: sample-backup-daemon
  namespace: demo
spec:
  target:
    apiGroup: apps
    kind: DaemonSet
    name: ks-demo
    namespace: demo
  backends:
  - name: s3-backend
    storageRef:
      name: s3-storage
      namespace: demo
    retentionPolicy:
      name: demo-retention
      namespace: demo
  sessions:
  - name: demo-session
    scheduler:
      schedule: "*/5 * * * *"
      jobTemplate:
        backoffLimit: 1
    repositories:
    - name: s3-demo-repo
      backend: s3-backend
      directory: /data/ks-demo
      encryptionSecret:
        name: encrypt-secret
        namespace: demo
    addon:
      name: workload-addon
      tasks:
      - name: logical-backup
        params:
          paths: /source/data
      jobTemplate:
        spec:
          serviceAccountName: bucket-user
    retryConfig:
      maxRetry: 2
      delay: 1m
Here,
Here, spec.sessions[*].addon.jobTemplate.spec.serviceAccountName refers to the name of the ServiceAccount to use in the backup job(s).
Let’s create the BackupConfiguration CR we have shown above,
$ kubectl apply -f https://github.com/kubestash/docs/raw/v2024.6.4/docs/guides/platforms/eks-irsa/examples/backupconfiguration.yaml
backupconfiguration.core.kubestash.com/sample-backup-daemon created
Verify Backup Setup Successful:
If everything goes well, the phase of the BackupConfiguration should be Ready. The Ready phase indicates that the backup setup is successful. Let’s verify the Phase of the BackupConfiguration,
$ kubectl get backupconfiguration -n demo
NAME                   PHASE   PAUSED   AGE
sample-backup-daemon   Ready            61s
Additionally, we can verify that the Repository specified in the BackupConfiguration has been created using the following command,
kubectl get repo -n demo
NAME               INTEGRITY   SNAPSHOT-COUNT   SIZE     PHASE   LAST-SUCCESSFUL-BACKUP   AGE
s3-demo-repo                  0                0 B      Ready                            3m
KubeStash keeps the backup for Repository YAMLs. If we navigate to the S3 bucket, we will see the Repository YAML stored in the demo/data/ks-demo directory.
Wait for BackupSession:
Now, wait for a schedule to appear. Run the following command to watch for a BackupSession object,
$ watch kubectl get backupsession -n demo
Every 2.0s: kubectl get backupsession -n demo                                 AppsCode-PC-03: Fri Jan 12 16:39:56 2024

NAME                                           INVOKER-TYPE          INVOKER-NAME           PHASE       DURATION   AGE
sample-backup-daemon-demo-session-1705055881   BackupConfiguration   sample-backup-daemon   Succeeded              116s
Here, the phase Succeeded means that the backup process has been completed successfully.
Verify Backup:
Now, we are going to verify whether the backed up data is present in the backend or not. Once a backup is completed, KubeStash will update the respective Repository object to reflect the backup completion. Check that the repository s3-demo-repo has been updated by the following command,
$ kubectl get repository -n demo s3-demo-repo
NAME           INTEGRITY   SNAPSHOT-COUNT   SIZE        PHASE   LAST-SUCCESSFUL-BACKUP   AGE
s3-demo-repo   true        1                2.368 KiB   Ready   3m36s                    4m59s
At this moment we have one Snapshot. Run the following command to check the respective Snapshot which represents the state of a backup run for an application.
$ kubectl get snapshots -n demo -l=kubestash.com/repo-name=s3-demo-repo
NAME                                                        REPOSITORY     SESSION        SNAPSHOT-TIME          DELETION-POLICY   PHASE       VERIFICATION-STATUS   AGE
s3-demo-repo-sample-backup-daemon-demo-session-1705055881   s3-demo-repo   demo-session   2024-01-12T10:38:09Z   Delete            Succeeded                         5m23s
Note: KubeStash creates a
Snapshotwith the following labels:
kubestash.com/app-ref-kind: <target-kind>kubestash.com/app-ref-name: <target-name>kubestash.com/app-ref-namespace: <target-namespace>kubestash.com/repo-name: <repository-name>These labels can be used to watch only the
Snapshots related to our desired Workload orRepository.
If we check the YAML of the Snapshot, we can find the information about the backed up components of the DaemonSet.
$ kubectl get snapshots -n demo s3-demo-repo-sample-backup-daemon-demo-session-1705055881 -oyaml
apiVersion: storage.kubestash.com/v1alpha1
kind: Snapshot
metadata:
  labels:
    kubestash.com/app-ref-kind: DaemonSet
    kubestash.com/app-ref-name: ks-demo
    kubestash.com/app-ref-namespace: demo
    kubestash.com/repo-name: s3-demo-repo
  name: s3-demo-repo-sample-backup-daemon-demo-session-1705055881
  namespace: demo
  ...
spec:
  ...
status:
  components:
    dump-ip-192-168-2-154.us-west-1.compute.internal:
      driver: Restic
      duration: 2.612620093s
      integrity: true
      path: repository/v1/demo-session/ip-192-168-2-154.us-west-1.compute.internal
      phase: Succeeded
      resticStats:
      - hostPath: /source/data
        id: f9a71dd2a53e0d109c995af85c2e6c9ade91db592e120cb11405ea2fd0d072f3
        size: 12 B
        uploaded: 1.054 KiB
      size: 809 B
    dump-ip-192-168-16-32.us-west-1.compute.internal:
      driver: Restic
      duration: 2.564976569s
      integrity: true
      path: repository/v1/demo-session/ip-192-168-16-32.us-west-1.compute.internal
      phase: Succeeded
      resticStats:
      - hostPath: /source/data
        id: 5b52d5b09b133953259daf1a50e730cc5e32cc903bcd7a380518cc4ca2d1f8a6
        size: 12 B
        uploaded: 1.049 KiB
      size: 809 B
    dump-ip-192-168-53-129.us-west-1.compute.internal:
      driver: Restic
      duration: 2.526652406s
      integrity: true
      path: repository/v1/demo-session/ip-192-168-53-129.us-west-1.compute.internal
      phase: Succeeded
      resticStats:
      - hostPath: /source/data
        id: 6c057583ab4fdacaa3616fdb4c10db8b49c4575533367b56ae53d62700be10e0
        size: 12 B
        uploaded: 1.050 KiB
      size: 807 B
  ...
For DaemonSet, KubeStash takes backup from every pod of the DaemonSet. Since we have three nodes in our cluster, three components have been backed up. For logical backup, KubeStash uses
dump-<node-name>as the component name, with<node-name>representing the name of the node where DaemonSet’s pod is deployed.
Now, if we navigate to the S3 bucket, we will see the backed up data stored in the demo/data/ks-demo/repository/v1/demo-session/dump-<node-name> directory. KubeStash also keeps the backup for Snapshot YAMLs, which can be found in the demo/data/ks-demo/snapshots directory.
Note: KubeStash stores all dumped data encrypted in the backup directory, meaning it remains unreadable until decrypted.
Restore
In this section, we are going to show you how to restore in the same DaemonSet which may be necessary when you have accidentally deleted any data.
Simulate Disaster:
Now, let’s simulate an accidental deletion scenario. Here, we are going to exec into the DaemonSet pod ks-demo-kjn7t and delete the data.txt file from /source/data.
$ kubectl exec -it -n demo ks-demo-kjn7t -- sh
/ #
/ # rm /source/data/data.txt
/ # cat /source/data/data.txt
cat: can't open '/source/data/data.txt': No such file or directory
/ # exit
Create RestoreSession:
To restore the DaemonSet, you have to create a RestoreSession object pointing to the DaemonSet.
Here, is the YAML of the RestoreSession object that we are going to use for restoring our ks-demo DaemonSet.
apiVersion: core.kubestash.com/v1alpha1
kind: RestoreSession
metadata:
  name: sample-restore
  namespace: demo
spec:
  target:
    apiGroup: apps
    kind: DaemonSet
    name: ks-demo
    namespace: demo
  dataSource:
    repository: s3-demo-repo
    snapshot: latest
    encryptionSecret:
      name: encrypt-secret
      namespace: demo
  addon:
    name: workload-addon
    tasks:
      - name: logical-backup-restore
    jobTemplate:
      spec:
        serviceAccountName: bucket-user
Here,
spec.addon.jobTemplate.spec.serviceAccountNamerefers to the name of theServiceAccountto use in the restore job(s).spec.dataSource.snapshotspecifies to restore from latestSnapshot.spec.dataSource.componentsrefers to the components that we want to restore. Here we want to restore data for all the pods of the DaemonSet so we have omitted the field.
Let’s create the RestoreSession object we have shown above,
$ kubectl apply -f https://github.com/kubestash/docs/raw/v2024.6.4/docs/guides/platforms/eks-irsa/examples/restoresession.yaml
restoresession.core.kubestash.com/sample-restore created
Once, you have created the RestoreSession object, KubeStash will create restore Job(s). Run the following command to watch the phase of the RestoreSession object,
$ watch kubectl get restoresession -n demo
Every 2.0s: kubectl get restores... AppsCode-PC-03: Wed Jan 10 17:13:18 2024

NAME             REPOSITORY      FAILURE-POLICY   PHASE       DURATION   AGE
sample-restore   s3-demo-repo                    Succeeded   3s         53s
The Succeeded phase means that the restore process has been completed successfully.
Verify Restored Data:
Now, lets exec into the DaemonSet pod ks-demo-kjn7t and verify whether actual data was restored or not,
$ kubectl exec -it -n demo ks-demo-kjn7t -- cat /source/data/data.txt
sample_data
Hence, we can see from the above output that the deleted data has been restored successfully from the backup.
Cleanup
To cleanup the Kubernetes resources created by this tutorial, run:
kubectl delete -n demo backupconfiguration sample-backup-daemon
kubectl delete -n demo restoresession sample-restore
kubectl delete -n demo secret encrypt-secret
kubectl delete -n demo backupstorage s3-storage
kubectl delete -n demo daemonset ks-demo
kubectl delete ns demo