


You are looking at the documentation of a prior release. To read the documentation of the latest release, please
visit here.
Backup resource YAMLs of a Namespace using KubeStash
This guide will show you how you can take backup of the resource YAMLs of a particular namespace using KubeStash.
Before You Begin
- At first, you need to have a Kubernetes cluster, and the
kubectlcommand-line tool must be configured to communicate with your cluster. - Install KubeStash in your cluster following the steps here.
- Install KubeStash
kubectlplugin in your local machine following the steps here. - If you are not familiar with how KubeStash backup the resource YAMLs, please check the following guide here.
You have to be familiar with the following custom resources:
To keep things isolated, we are going to use a separate namespace called demo throughout this tutorial. Create the demo namespace if you haven’t created it already.
$ kubectl create ns demo
namespace/demo created
Note: YAML files used in this tutorial are stored here.
Prepare for Backup
In this section, we are going to configure a backup for all the resource YAMLs of kube-system namespace.
Prepare Backend
Now, we are going backup of the YAMLs of a particular namespace to a GCS bucket using KubeStash. For this, we have to create a Secret with necessary credentials and a BackupStorage object. If you want to use a different backend, please read the respective backend configuration doc from here.
For GCS backend, if the bucket does not exist, KubeStash needs
Storage Object Adminrole permissions to create the bucket. For more details, please check the following guide.
Create Secret:
At first, let’s create a secret called gcs-secret with access credentials to our desired GCS bucket,
$ echo -n '<your-project-id>' > GOOGLE_PROJECT_ID
$ cat /path/to/downloaded/sa_key_file.json > GOOGLE_SERVICE_ACCOUNT_JSON_KEY
$ kubectl create secret generic -n demo gcs-secret \
    --from-file=./GOOGLE_PROJECT_ID \
    --from-file=./GOOGLE_SERVICE_ACCOUNT_JSON_KEY
secret/gcs-secret created
Create BackupStorage:
Now, create a BackupStorage custom resource specifying the desired bucket, and directory inside the bucket where the backed up data will be stored.
Below is the YAML of BackupStorage object that we are going to create,
apiVersion: storage.kubestash.com/v1alpha1
kind: BackupStorage
metadata:
  name: gcs-storage
  namespace: demo
spec:
  storage:
    provider: gcs
    gcs:
      bucket: kubestash-qa
      prefix: demo
      secretName: gcs-secret
  usagePolicy:
    allowedNamespaces:
      from: All
  default: true
  deletionPolicy: WipeOut
Let’s create the BackupStorage object that we have shown above,
$ kubectl apply -f https://github.com/kubestash/docs/raw/v2024.6.4/docs/guides/kubedump/namespace/examples/backupstorage.yaml
backupstorage.storage.kubestash.com/gcs-repo created
Now, we are ready to backup our namespace yaml resources.
Create RetentionPolicy:
Now, we have to create a RetentionPolicy object to specify how the old Snapshots should be cleaned up.
Below is the YAML of the RetentionPolicy object that we are going to create,
apiVersion: storage.kubestash.com/v1alpha1
kind: RetentionPolicy
metadata:
  name: demo-retention
  namespace: demo
spec:
  default: true
  failedSnapshots:
    last: 2
  maxRetentionPeriod: 2mo
  successfulSnapshots:
    last: 5
  usagePolicy:
    allowedNamespaces:
      from: Same
Notice the spec.usagePolicy that allows referencing the RetentionPolicy from all namespaces.For more details on configuring it for specific namespaces, please refer to the following link.
Let’s create the RetentionPolicy object that we have shown above,
$ kubectl apply -f https://github.com/kubestash/docs/raw/v2024.6.4/docs/guides/kubedump/namespace/examples/retentionpolicy.yaml
retentionpolicy.storage.kubestash.com/demo-retention created
Create RBAC
To take backup of the resource YAMLs of a particular namespace KubeStash creates a backup Job. This Job requires read permission for all the resources of the desired namespace. By default, KubeStash does not grant such permissions. We have to provide the necessary permissions manually.
Here, is the YAML of the ServiceAccount, ClusterRole, and ClusterRoleBinding that we are going to use for granting the necessary permissions.
apiVersion: v1
kind: ServiceAccount
metadata:
  name: cluster-resource-reader
  namespace: demo
---
apiVersion: rbac.authorization.k8s.io/v1
kind: ClusterRole
metadata:
  name: cluster-resource-reader
rules:
- apiGroups: ["*"]
  resources: ["*"]
  verbs: ["get","list"]
---
apiVersion: rbac.authorization.k8s.io/v1
kind: ClusterRoleBinding
metadata:
  name: cluster-resource-reader
subjects:
- kind: ServiceAccount
  name: cluster-resource-reader
  namespace: demo
roleRef:
  kind: ClusterRole
  name: cluster-resource-reader
  apiGroup: rbac.authorization.k8s.io
Here, we have give permission to read all the cluster resources. You can restrict this permission to a particular namespace only.
Let’s create the RBAC resources we have shown above,
$ kubectl apply -f https://github.com/kubestash/docs/raw/v2024.6.4/docs/guides/kubedump/namespace/examples/rbac.yaml
serviceaccount/cluster-resource-reader created
clusterrole.rbac.authorization.k8s.io/cluster-resource-reader created
clusterrolebinding.rbac.authorization.k8s.io/cluster-resource-reader created
Now, we are ready for backup. In the next section, we are going to schedule a backup for our cluster resources.
Backup
To schedule a backup, we have to create a BackupConfiguration object.
Create Secret:
We also have to create another Secret with an encryption key RESTIC_PASSWORD for Restic. This secret will be used by Restic for encrypting the backup data.
Let’s create a secret named encry-secret with the Restic password.
$ echo -n 'changeit' > RESTIC_PASSWORD
$ kubectl create secret generic -n demo encrypt-secret \
    --from-file=./RESTIC_PASSWORD
secret/encrypt-secret created
Create BackupConfiguration
Below is the YAML for BackupConfiguration object we care going to use to backup the YAMLs of the cluster resources,
apiVersion: core.kubestash.com/v1alpha1
kind: BackupConfiguration
metadata:
  name: kube-system-backup
  namespace: demo
spec:
  target:
    apiGroup: ""
    kind: Namespace
    name: kube-system
  backends:
    - name: gcs-backend
      storageRef:
        namespace: demo
        name: gcs-storage
      retentionPolicy:
        name: demo-retention
        namespace: demo
  sessions:
    - name: frequent-backup
      sessionHistoryLimit: 3
      scheduler:
        schedule: "*/5 * * * *"
        jobTemplate:
          backoffLimit: 1
      repositories:
        - name: gcs-repository
          backend: gcs-backend
          directory: /kube-system-manifests
          encryptionSecret:
            name: encrypt-secret
            namespace: demo
          deletionPolicy: WipeOut
      addon:
        name: kubedump-addon
        tasks:
          - name: manifest-backup
        jobTemplate:
          spec:
            serviceAccountName: cluster-resource-reader
Here,
spec.sessions[*].addon.namespecifies the name of theAddon.spec.sessions[*].addon.tasks[*].namespecifies the name of the backup task.spec.sessions[*].addon.jobTemplate.spec.serviceAccountNamespecifies the ServiceAccount name that we have created earlier with cluster-wide resource reading permission.
Let’s create the BackupConfiguration object we have shown above,
$ kubectl apply -f https://github.com/kubestash/docs/raw/v2024.6.4/docs/guides/kubedump/namespace/examples/backupconfiguration.yaml
backupconfiguration.core.kubestash.com/kube-system-backup created
Verify Backup Setup Successful
If everything goes well, the phase of the BackupConfiguration should be in Ready state. The Ready phase indicates that the backup setup is successful.
Let’s check the Phase of the BackupConfiguration
$ kubectl get backupconfiguration -n demo
NAME                              PHASE   PAUSED   AGE
kube-system-backup                Ready            79s
Verify Repository:
Verify that the Repository specified in the BackupConfiguration has been created using the following command,
$ kubectl get repositories -n demo
NAME             INTEGRITY   SNAPSHOT-COUNT   SIZE   PHASE   LAST-SUCCESSFUL-BACKUP   AGE
gcs-repository                                       Ready                            28s
KubeStash keeps the backup for Repository YAMLs. If we navigate to the GCS bucket, we will see the Repository YAML stored in the demo/kube-system-manifests directory.
Verify CronJob:
Verify that KubeStash has created a CronJob with the schedule specified in spec.sessions[*].scheduler.schedule field of BackupConfiguration object.
Check that the CronJob has been created using the following command,
$ kubectl get cronjob -n demo
NAME                                                  SCHEDULE      SUSPEND   ACTIVE   LAST SCHEDULE   AGE
trigger-kube-system-backup-frequent-backup            */5 * * * *   False     0        <none>          45s
Wait for BackupSession:
Now, wait for the next backup schedule. You can watch for BackupSession CR using the following command,
$ Every 1.0s: kubectl get backupsession -n demo -l=kubestash.com/invoker-name=kube-system-backup                                               anisur: Fri Feb 23 18:34:53 2024

NAME                                            INVOKER-TYPE          INVOKER-NAME         PHASE       DURATION   AGE
kube-system-backup-frequent-backup-1708691400   BackupConfiguration   kube-system-backup   Succeeded              4m53s
Verify Backup:
When BackupSession is created, KubeStash operator creates Snapshot for each Repository listed in the respective session of the BackupConfiguration. Since we have only specified one repository in the session, at this moment we should have one Snapshot.
Run the following command to check the respective Snapshot,
$ kubectl get snapshots -n demo
NAME                                                           REPOSITORY       SESSION           SNAPSHOT-TIME          DELETION-POLICY   PHASE       AGE
gcs-repository-kube-system-backup-frequent-backup-1708691400   gcs-repository   frequent-backup   2024-02-23T12:30:00Z   Delete            Succeeded   5m9s
Now, if we navigate to the GCS bucket, we will see the backed up data stored in the demo/kube-system-manifests/repository/v1/frequent-backup/manifest directory. KubeStash also keeps the backup for Snapshot YAMLs, which can be found in the demo/kube-system-manifests/repository/snapshots directory.
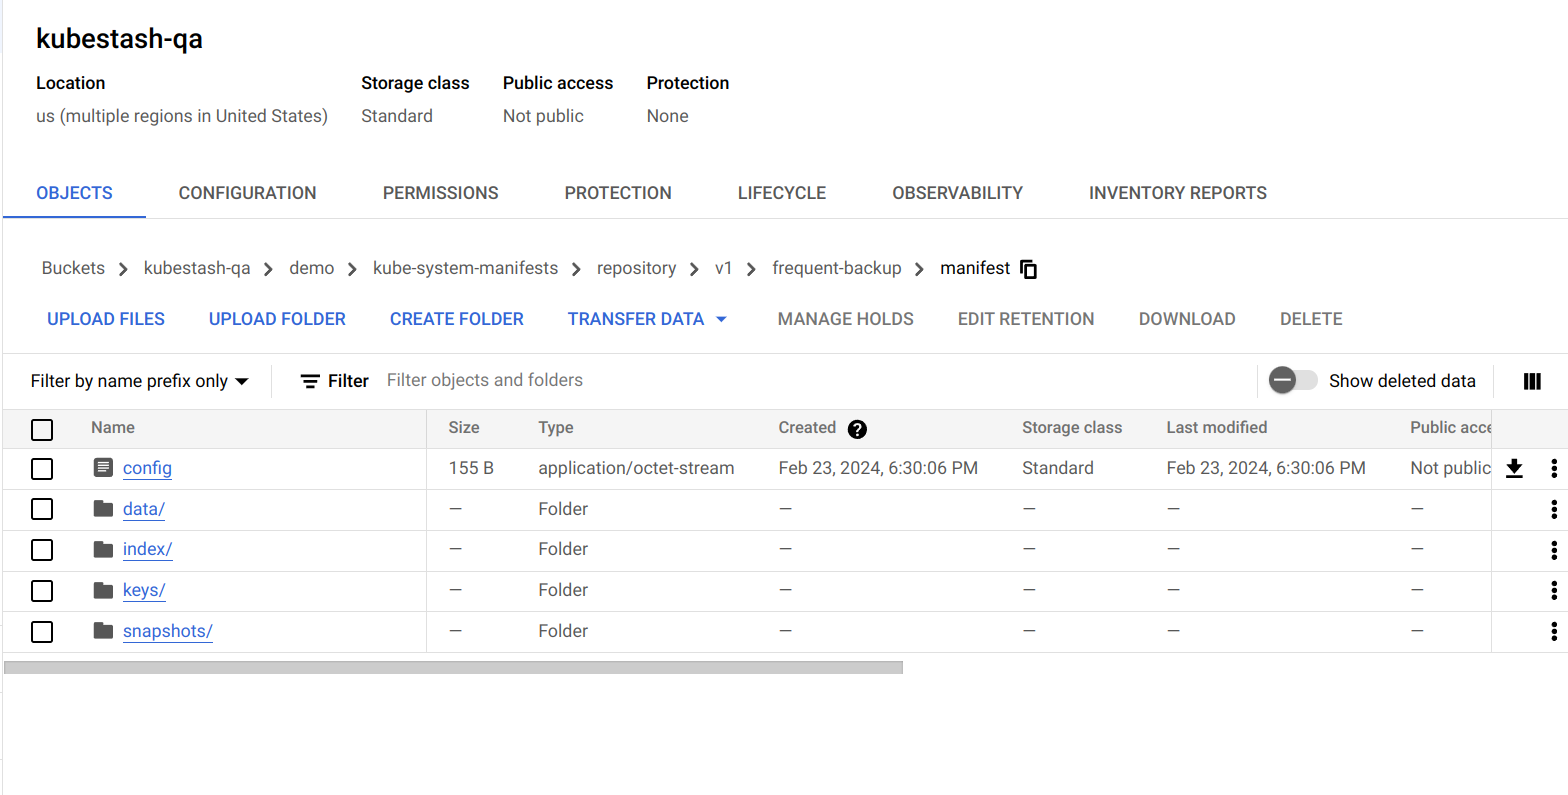
Note: KubeStash stores all dumped data encrypted in backup directory, meaning it remains unreadable until decrypted.
Restore
KubeStash does not provide any automatic mechanism to restore the cluster resources from the backed-up YAMLs. Your application might be managed by Helm or by an operator. In such cases, just applying the YAMLs is not enough to restore the application. Furthermore, there might be an order issue. Some resources must be applied before others. It is difficult to generalize and codify various application-specific logic.
Therefore, it is the user’s responsibility to download the backed-up YAMLs and take the necessary steps based on his application to restore it properly.
Download the YAMLs
KubeStash provides a kubectl plugin for making it easy to download a snapshot locally.
Now, let’s download the latest Snapshot from our backed-up data into the $HOME/Downloads/kubestash/namespace/kube-system folder of our local machine.
$ kubectl kubestash download --namespace=demo gcs-repository-kube-system-backup-frequent-backup-1708691400 --destination=$HOME/Downloads/kubestash/namespace/kube-system/
Now, lets use tree command to inspect downloaded YAMLs files.
$ tree /home/anisur/Downloads/kubestash/namespace/kube-system
/home/anisur/Downloads/kubestash/namespace/kube-system
└── gcs-repository-kube-system-backup-frequent-backup-1708691400
    └── manifest
        └── tmp
            └── manifest
                ├── ConfigMap
                │   ├── coredns.yaml
                │   ├── extension-apiserver-authentication.yaml
                │   ├── kubeadm-config.yaml
                ├── ControllerRevision
                │   ├── kindnet-685dcc8c4c.yaml
                │   └── kube-proxy-7ccf78d585.yaml
                ├── DaemonSet
                │   ├── kindnet.yaml
                │   └── kube-proxy.yaml
                ├── Deployment
                │   └── coredns.yaml
                ├── Endpoints
                │   └── kube-dns.yaml
                ├── EndpointSlice
                │   └── kube-dns-nv9px.yaml
                ├── Lease
                │   ├── kube-controller-manager.yaml
                │   └── kube-scheduler.yaml
                ├── Pod
                │   ├── coredns-565d847f94-78r86.yaml
                │   ├── coredns-565d847f94-zdtcs.yaml
                │   ├── etcd-kind-control-plane.yaml
                │   ├── kindnet-qb7b8.yaml
                ├── ReplicaSet
                │   └── coredns-565d847f94.yaml
                ├── Role
                │   ├── extension-apiserver-authentication-reader.yaml
                │   ├── kubeadm:kubelet-config.yaml
                │   ├── kubeadm:nodes-kubeadm-config.yaml
                │   ├── kube-proxy.yaml
                ├── RoleBinding
                │   ├── kubeadm:kubelet-config.yaml
                │   ├── kubeadm:nodes-kubeadm-config.yaml
                │   ├── kube-proxy.yaml
                │   ├── system:controller:bootstrap-signer.yaml
                │   ├── system:controller:cloud-provider.yaml
                ├── Service
                │   └── kube-dns.yaml
                └── ServiceAccount
                    ├── attachdetach-controller.yaml
                    ├── bootstrap-signer.yaml
                    ├── certificate-controller.yaml
                    ├── cluster-resource-reader.yaml
                    ├── clusterrole-aggregation-controller.yaml
                    ├── coredns.yaml

17 directories, 80 files
Here, the resources has been grouped under the respective Kind folder.
Let’s inspect the YAML of coredns.yaml file under ConfigMap folder,
$ cat /home/anisur/Downloads/kubestash/namespace/kube-system/gcs-repository-kube-system-backup-frequent-backup-1708691400/manifest/tmp/manifest/ConfigMap/coredns.yaml
apiVersion: v1
data:
  Corefile: |
    .:53 {
        errors
        health {
           lameduck 5s
        }
        ready
        kubernetes cluster.local in-addr.arpa ip6.arpa {
           pods insecure
           fallthrough in-addr.arpa ip6.arpa
           ttl 30
        }
        prometheus :9153
        forward . /etc/resolv.conf {
           max_concurrent 1000
        }
        cache 30
        loop
        reload
        loadbalance
    }
kind: ConfigMap
metadata:
  name: coredns
  namespace: kube-system
Now, you can use these YAML files to re-create your desired application.
Cleanup
To cleanup the Kubernetes resources created by this tutorial, run:
kubectl delete -n demo backupconfiguration kube-system-backup
kubectl delete -n kubestash serviceaccount cluster-resource-reader
kubectl delete clusterrole cluster-resource-reader
kubectl delete clusterrolebinding cluster-resource-reader
kubectl delete retentionPolicy -n demo demo-retention
kubectl delete -n demo backupstorage gcs-storage
kubectl delete secret -n demo encrypt-secret
kubectl delete secret -n demo gcs-secret